Getting Started
Signing up
- Go to: https://www.cliknview.com/users/sign_up
-
Enter the following information:
- Email Address (required)
- Full Name (required)
- Company Name (optional)
- Password (required)
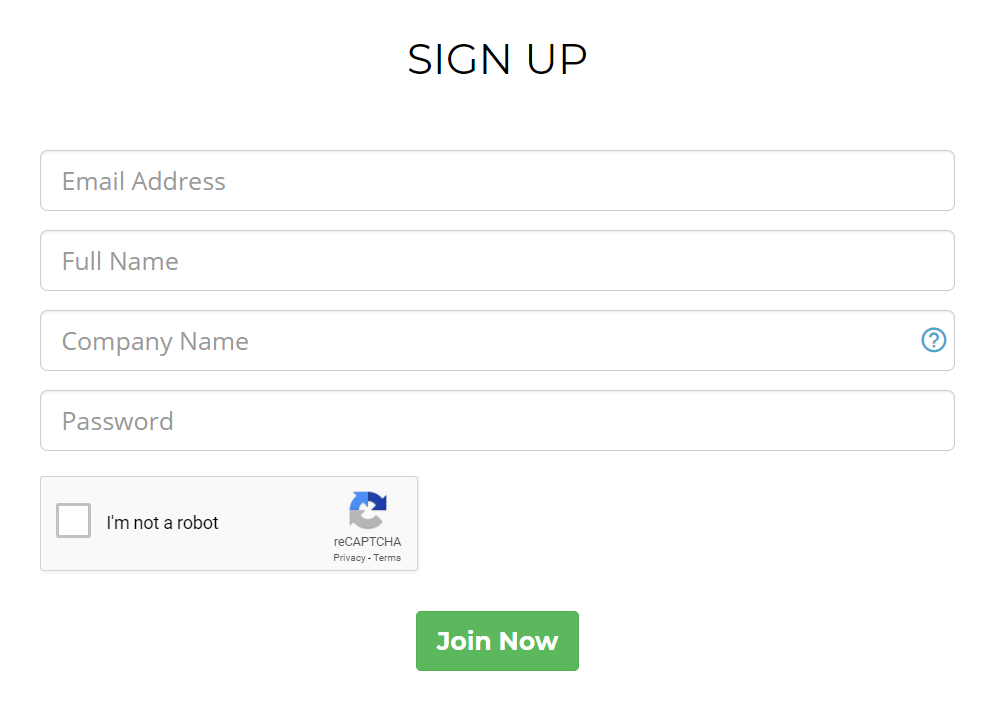
- Verify that you’re not a robot by checking off “I’m not a robot”.
- Click on “Sign Up”.
- Open the verification email sent to our inbox from support@cliknview.com
- Click on “Login” from within the verification email.
- Navigate to your Profile page and add a logo that will be displayed to your clients in email correspondence that the platform sends on your behalf and when your clients view your projects.
Creating a project
- To get started with creating a project, login to our account.
-
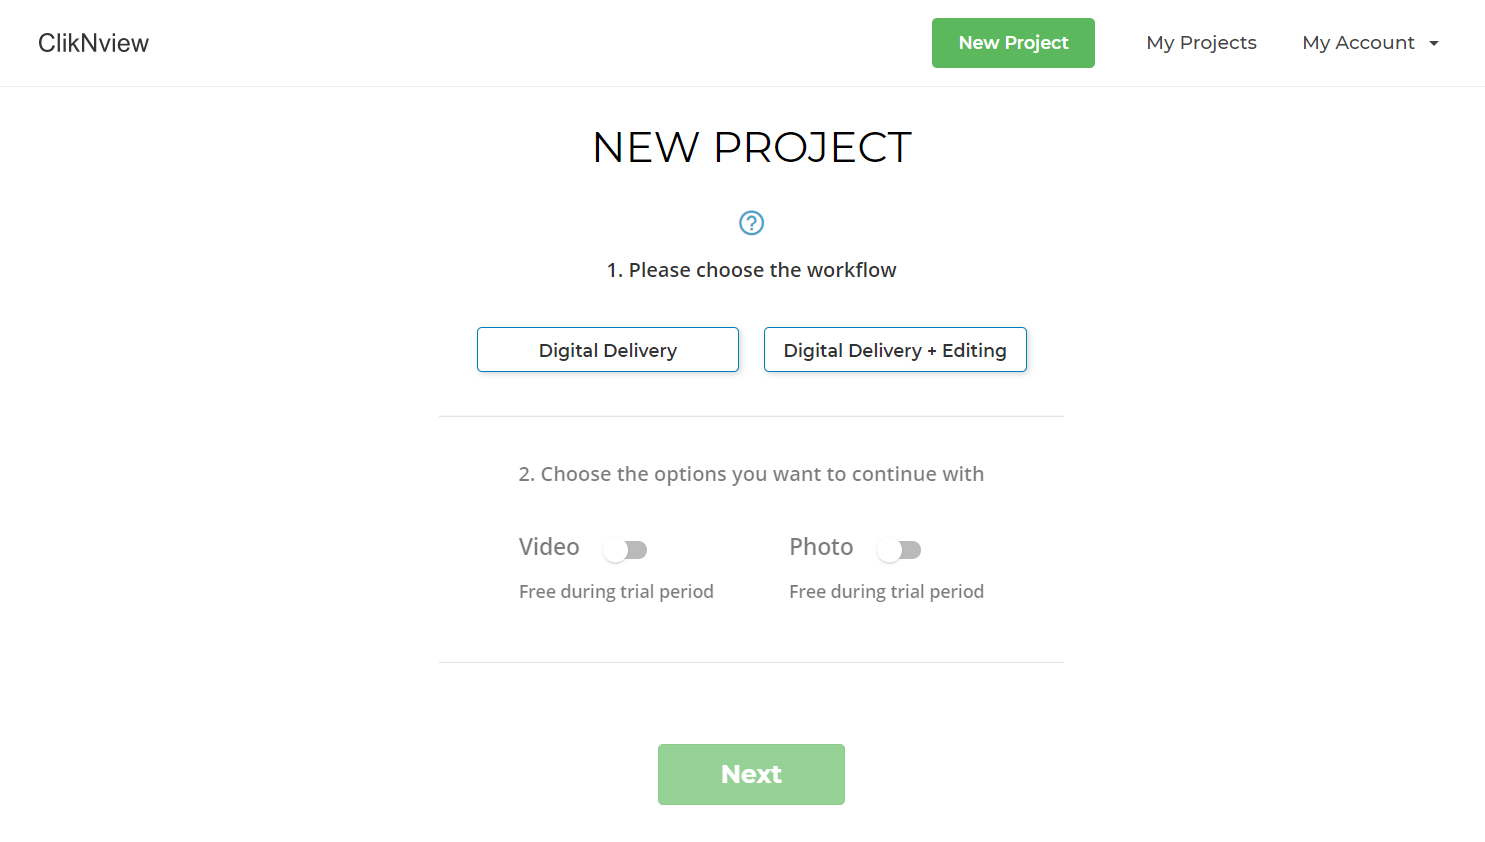
Click on the “New Project” button on the top header.
- Select one of the two options by clicking on “Digital Delivery + Editing” OR “Digital Delivery”. 1
-
Next, select “Video” and/or “Photo”, and “Extended Access + Sharing”.
2
-
Input project details:
- Event Name (i.e. Jack and Jill’s Wedding, Lauren’s Birthday, etc.)
- Event Type (select from dropdown)
- Event Date (this is the actual date of the event, such as the wedding)
- Upload a cover photo
- Balance Due 3 (input the balance that your clients still owe)
- Client First Name
- Client Last Name
- Client Email Address
- Client Phone Number
- Optional: Add “Second Client”
- Click on “Create Event”
You have the option to add a second client’s information if you’d like more than one person to have access to the project. The clients you list here will be the owners of this project once all of the videos and photos have been uploaded and finalized. Only the client(s) you list here will be able to review the draft video and provide notes for edits, or select photos for print. They will NOT be able to share the photos or videos with others until they have completed the photo selection for print or video review processes. Once they have completed the photo selection process and video review process, then they’ll be able to share their videos and photos with others.
If you create a project before the actual date of the event (e.g. you create the project on January 1, but the wedding is March 1) and input a balance due, then ClikNview will notify your clients via email and text message that their event date is approaching and that they need to pay any balance due before that date. Once again, your clients can either pay directly through ClikNview or they can pay you by any other means you decide. ClikNview is an easy and cost effective way to get paid. Also, note that your clients will pay the transaction fees (e.g. if the balance due is $100, then you will get $100 transferred into your account).

- Click on “Create Event”.
View the following pages for next steps, depending on what you’d like to do:
Photographers:
Cinematographers:
- Compression Guidelines for Exporting Videos
- Uploading Draft Version of Videos for Review
- Uploading Final Production for Digital Delivery
- Requesting Media
- Cancelling Media Request
- Viewing Requested Media
1 Please note that “Digital Delivery + Editing” should be selected by cinematographers when client feedback is required for the draft version of the video. Your clients can review the video and provide feedback regarding the edits to be incorporated for the final production. Also, “Digital Delivery + Editing” should be used by photographers that need their clients to select photos for print. Further, once the final production of the video is ready your clients can stream, share, and download the source file. Also, once the photo selection for print is completed, your clients can stream, share, and download either the original or high quality images. In contrast, “Digital Delivery” should be used by photographers and cinematographers when no creative input or editing is required. The videos and/or photos can be delivered to your clients so that they can stream, share, and download.
2 Selecting “Video” will activate the video page for cinematographers to add the draft and/or final videos for client access. Selecting “Photo” will activate the photo page for photographers to upload photos. Only activate the workflow you use (e.g. cinematographers should only use the “Video” workflow while photographers should only use the “Photo” workflow.) Once a project is finalized, your clients will have access to view and download the videos and/or photos for 90-days. If you activate the “Extended Access + Sharing” option then your clients will have an additional 12-months to view, download, and also share.“Extended Access + Sharing” gives your clients the ability to view, download, and share their videos and/or photos for a total of 15-months when this option is activated. There are NO time constraints during the video review and photo selection phase, if “Digital Delivery + Editing” is activated. In other words, during the video review or photo selection process you and your clients will have as much time as you need to get the job done.
3 If your clients have a “Balance Due,” then you can enter it here. This feature will ensure that your clients cannot view the final production of the video or photos until they have paid their balance due. Your clients can pay directly through ClikNview and you will be notified via email to add your bank account details to get paid. Transfers typically take 7 business days. If there is no balance due, then you can enter $0 or leave it blank.
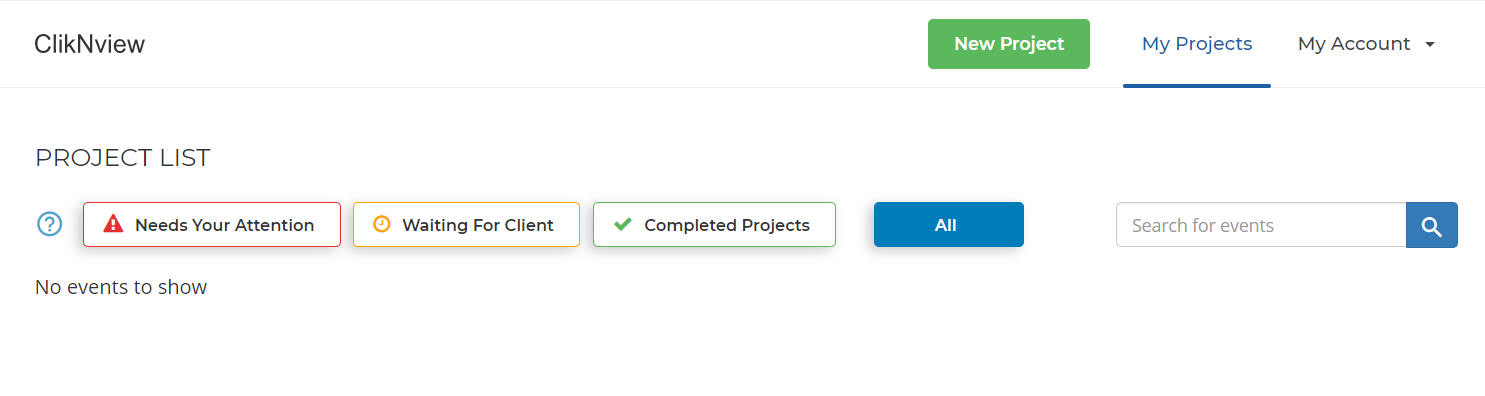
View My Projects
To view a list of all projects, click on the “My Projects” link in the header. The following page will be displayed:
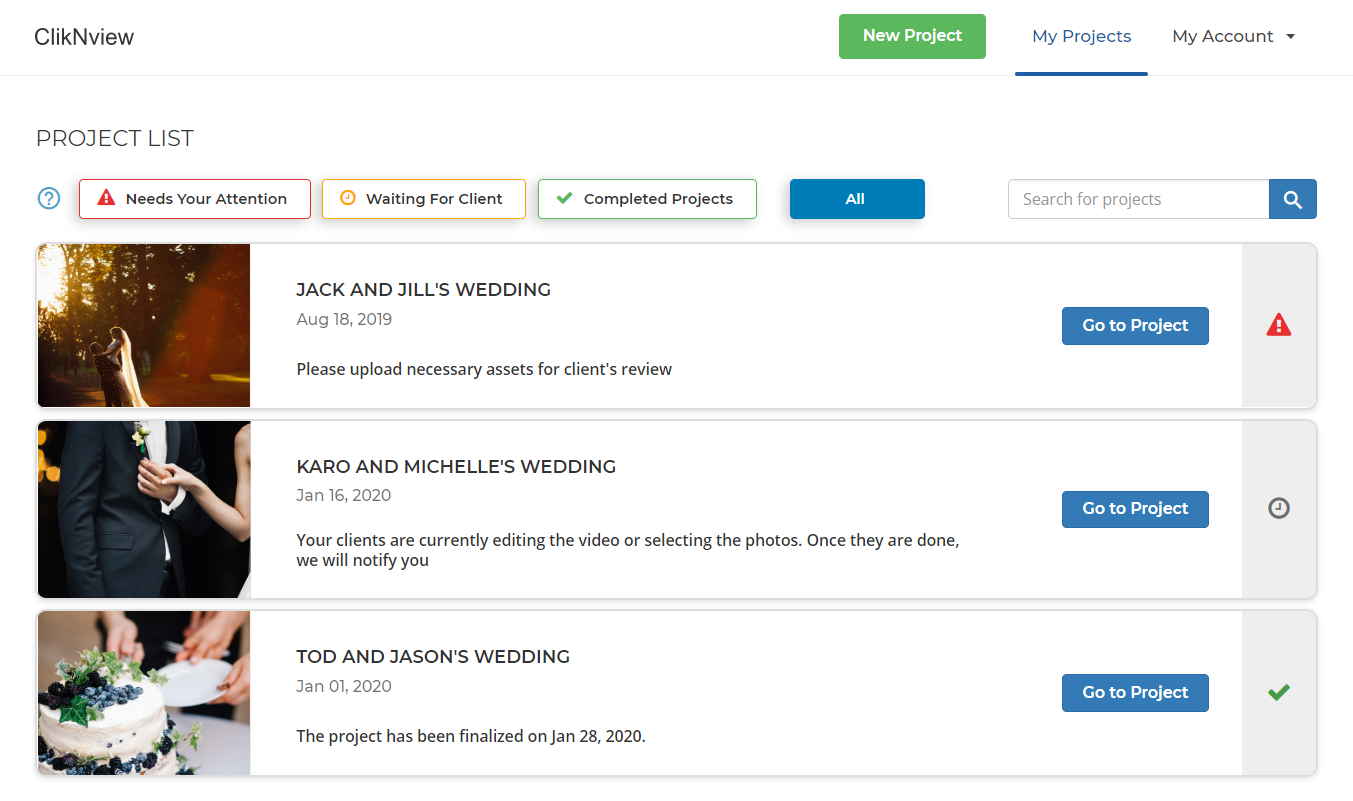
Project Dashboard
The project dashboard is where you see the details for the project that you created.
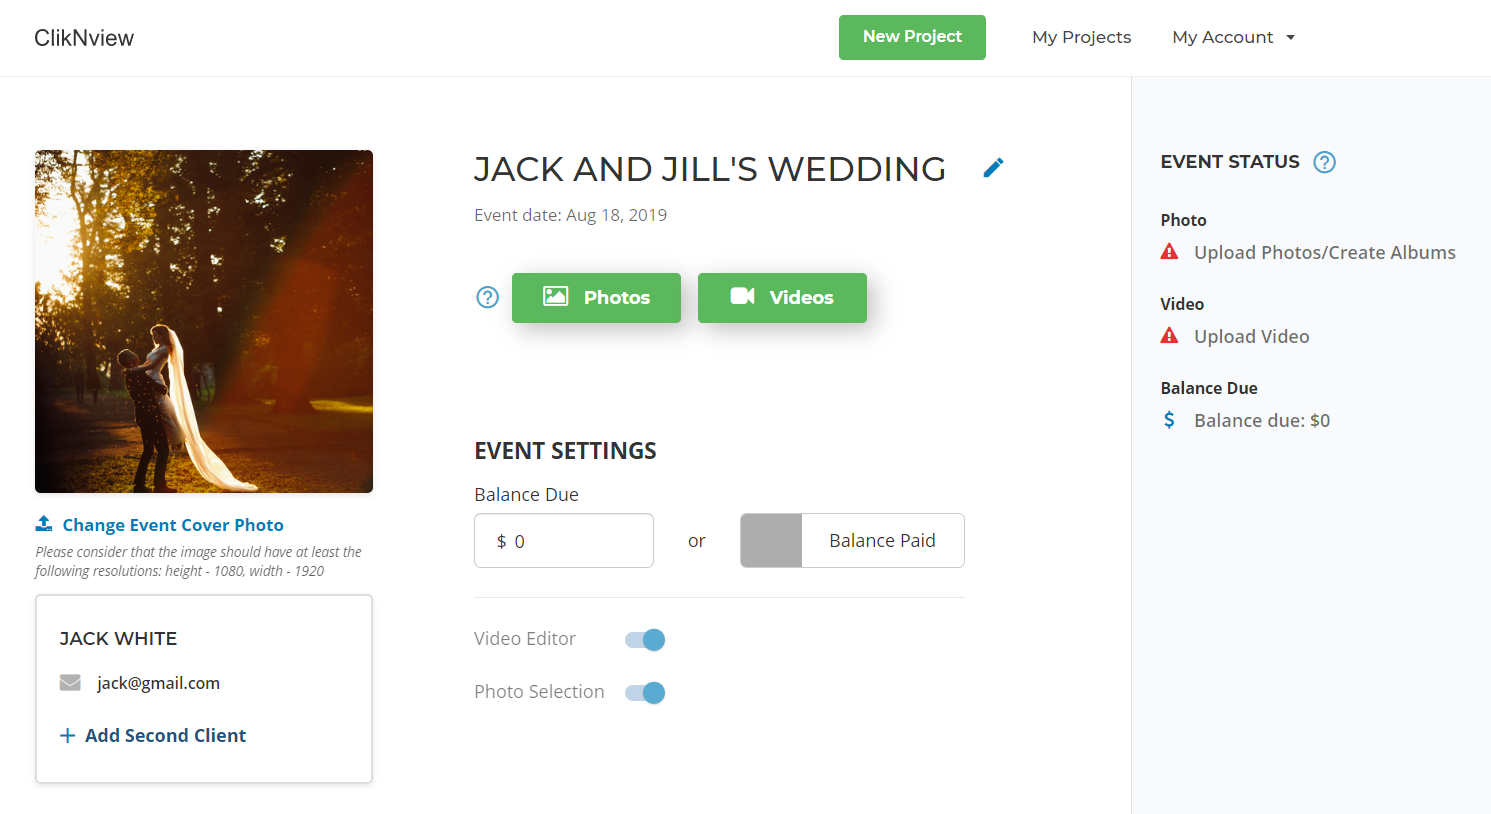
Understanding the options:
- “Change event cover photo” - You can update cover photo by uploading a new one.
- Update project title & date - Clicking on the icon next to the title.
- View the Photos or the Videos pages.
- You can modify the balance due or if it has been paid to you directly, you can click on “Balance Paid”.
- You can turn on an option if it was not selected during the event creation process (e.g. you can turn on the video workflow if you had initially only turned on the photo workflow. Once an option has been turned on, it cannot be turned off).
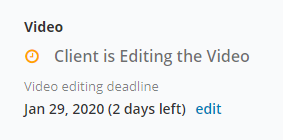
Understanding Event Status messages in the sidebar:
-
Photo:
Upload Photos/Create Albums
-
Video:
Upload Video